Alternate Youtube Link – https://youtu.be/_vrT1ESJ0qk
Campus Wayfinder Link – https://campuswayfinderar.netlify.app
Logo
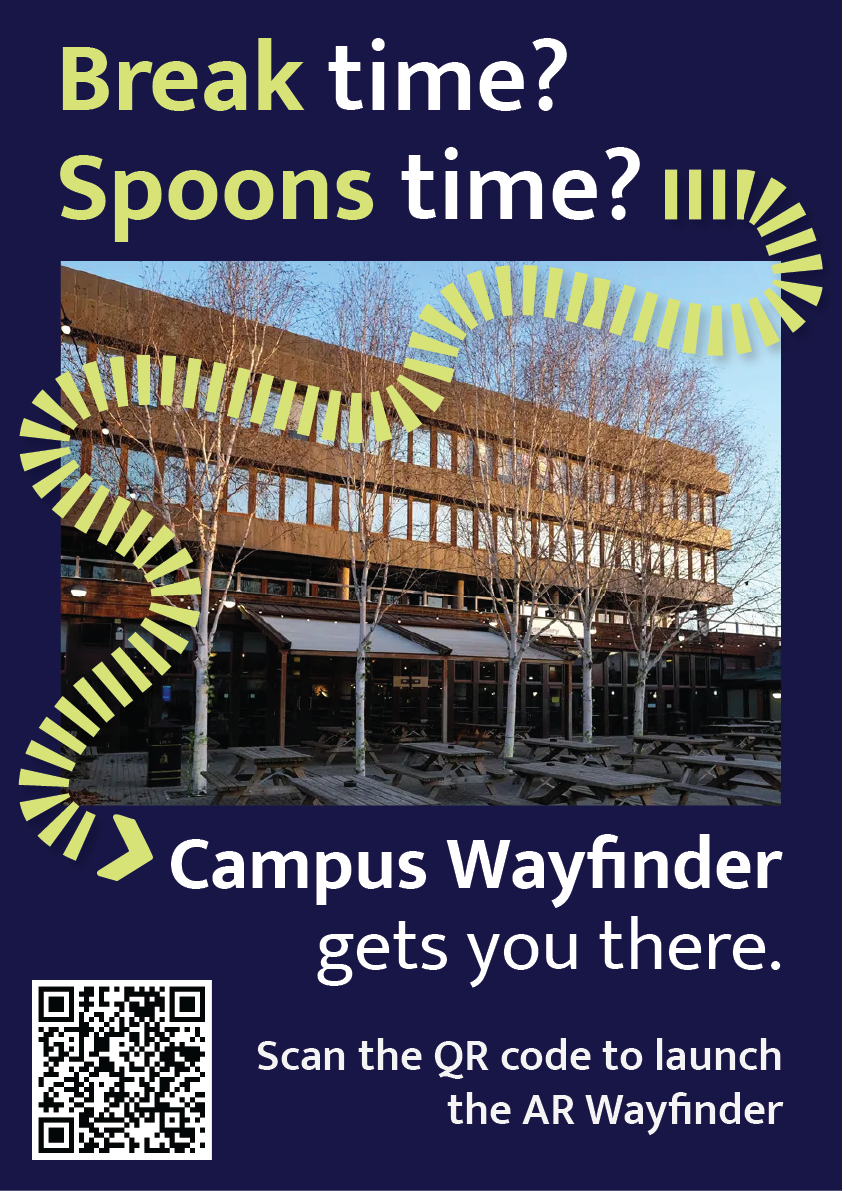
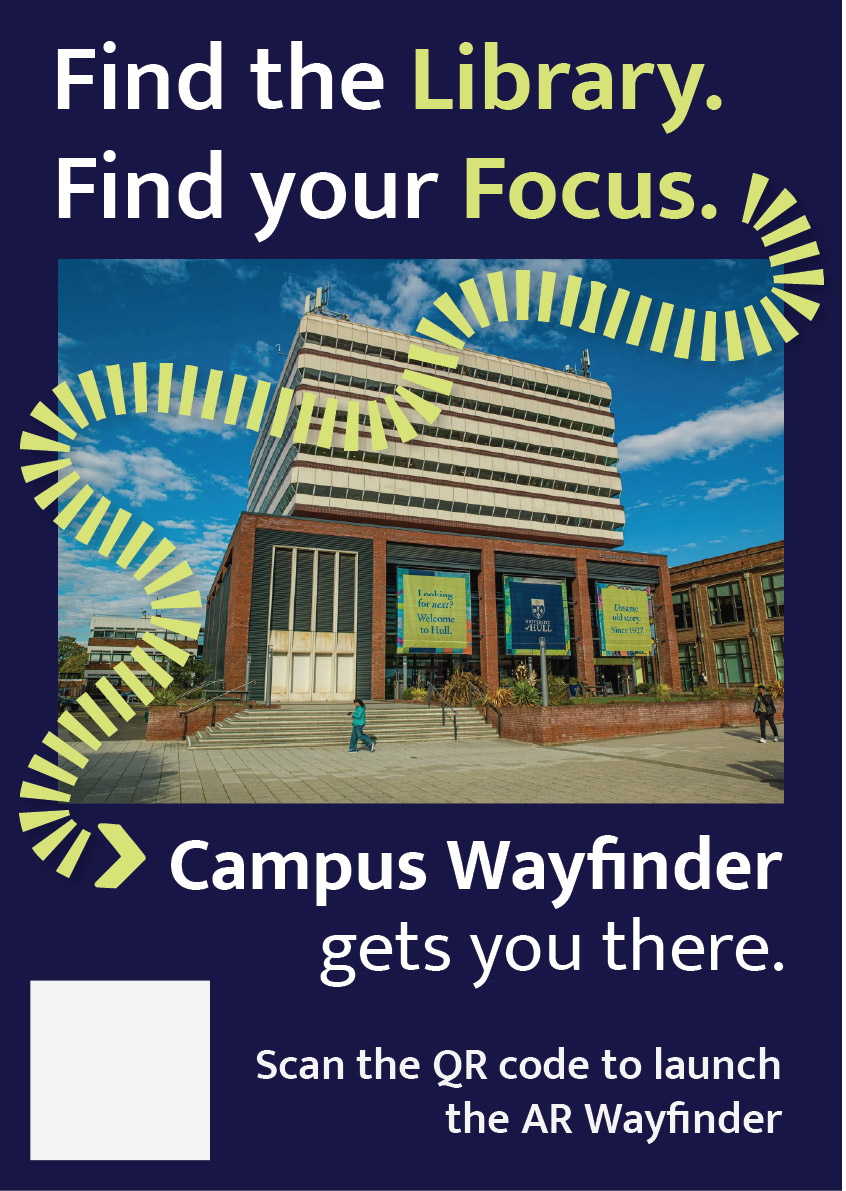
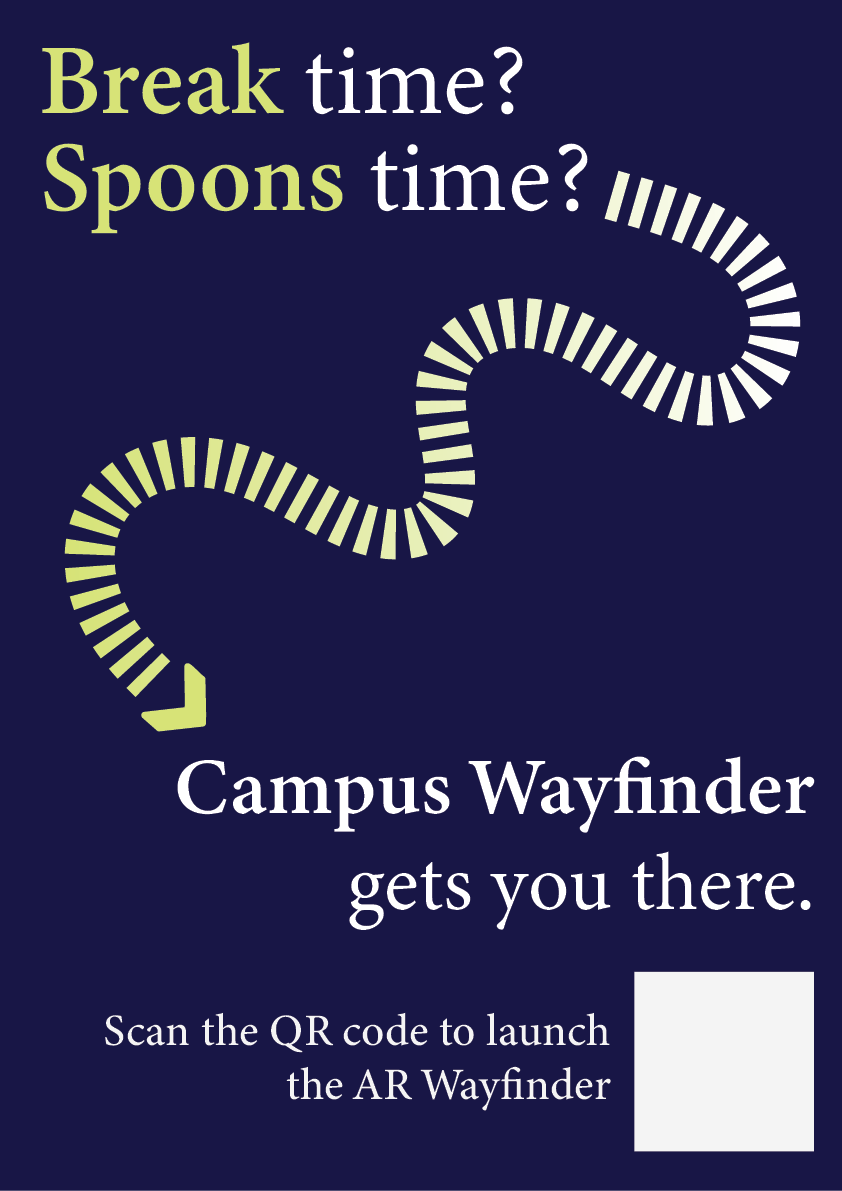
Final Posters
Early Concept Poster Mockup
Code
<!doctype html>
<html lang="en">
<head>
  <meta charset="utf-8" />
  <meta name="viewport" content="width=device-width, initial-scale=1, viewport-fit=cover" />
  <title>Campus Wayfinder</title>

  <style>
    /* simple palette */
    :root{
      --navy:#0b1230;
      --lime:#b8ff3b;
      --text:#ffffff;
      --card:rgba(11,18,48,.78);
      --border:rgba(255,255,255,.10);
      --shadow:0 12px 30px rgba(0,0,0,.35);
    }
    html,body{margin:0;height:100%;background:#000;font-family:system-ui,-apple-system,Segoe UI,Roboto,Arial}
    *{box-sizing:border-box}

    /* camera */
    #cam{
      position:fixed; inset:0;
      width:100vw; height:100vh;
      object-fit:cover;
      background:#000;
    }

    /* splash */
    #splash{
      position:fixed; inset:0;
      display:flex; flex-direction:column;
      justify-content:center; align-items:center;
      gap:18px;
      background:linear-gradient(180deg,var(--navy),#040812);
      z-index:50;
      transition:opacity .6s ease;
    }
    #splash.hide{opacity:0; pointer-events:none; visibility:hidden}
    #splash img{width:min(260px,64vw); height:auto; filter:drop-shadow(0 14px 28px rgba(0,0,0,.35))}
    #spinner{
      width:28px;height:28px;border-radius:50%;
      border:3px solid rgba(184,255,59,.25);
      border-top-color:var(--lime);
      animation:spin 1s linear infinite;
    }
    @keyframes spin{to{transform:rotate(360deg)}}

    /* menu */
    #menu{
      position:fixed;
      left:50%; top:52%;
      transform:translate(-50%,-50%);
      width:min(380px,92vw);
      background:var(--card);
      border:1px solid var(--border);
      border-radius:22px;
      padding:18px 16px;
      color:var(--text);
      z-index:40;
      backdrop-filter:blur(10px);
      box-shadow:var(--shadow);
      opacity:0;
      pointer-events:none;
      transition:opacity .35s ease;
    }
    #menu.show{opacity:1; pointer-events:auto}
    #menu h1{margin:6px 0 6px; font-size:20px}
    #menu p{margin:0 0 12px; font-size:13px; opacity:.9; line-height:1.35}

    .btnRow{display:flex; gap:10px}
    button{
      appearance:none; border:0;
      border-radius:16px;
      padding:12px 14px;
      font-weight:800;
      cursor:pointer;
      transition:transform .06s ease, filter .12s ease, background .12s ease;
      flex:1;
    }
    button:active{transform:translateY(1px)}
    .btnPrimary{background:var(--lime); color:#061024}
    .btnPrimary:active{filter:brightness(.88)}
    .btnGhost{background:rgba(255,255,255,.12); color:var(--text)}
    .btnGhost:active{background:rgba(255,255,255,.18)}

    /* HUD */
    #hud{
      position:fixed; inset:0;
      z-index:20;
      pointer-events:none;
      display:flex; flex-direction:column;
      padding:12px 12px calc(14px + env(safe-area-inset-bottom));
      gap:10px;
      opacity:0;
      transition:opacity .3s ease;
    }
    #hud.on{opacity:1}

    #topCard{
      align-self:center;
      width:min(520px,94vw);
      background:var(--card);
      border:1px solid var(--border);
      border-radius:20px;
      padding:12px 14px;
      color:var(--text);
      backdrop-filter:blur(10px);
      box-shadow:var(--shadow);
    }
    #topTitle{font-weight:900; font-size:16px; margin:0}
    #topSub{margin:2px 0 0; font-size:12px; opacity:.88}

    /* passing toast */
    #toast{
      align-self:center;
      width:min(520px,94vw);
      overflow:hidden;
      border-radius:999px;
      background:rgba(184,255,59,.92);
      color:#061024;
      box-shadow:var(--shadow);
      padding:10px 14px;
      font-weight:900;
      font-size:13px;
      white-space:nowrap;
      opacity:0;
      transform:translateX(-20px);
    }
    .toastIn{animation:toastIn .35s ease forwards}
    .toastOut{animation:toastOut .35s ease forwards}
    @keyframes toastIn{to{opacity:1;transform:translateX(0)}}
    @keyframes toastOut{to{opacity:0;transform:translateX(20px)}}

    /* center arrow */
    #center{
      flex:1;
      display:flex;
      flex-direction:column;
      align-items:center;
      justify-content:center;
      gap:14px;
    }
    #arrowWrap{
      width:180px; height:180px;
      display:grid; place-items:center;
      position:relative;
    }
    #semi{
      position:absolute;
      width:210px; height:105px;
      border-radius:210px 210px 0 0;
      background:rgba(11,18,48,.55);
      border:1px solid var(--border);
      bottom:-28px;
      backdrop-filter:blur(10px);
    }
    #arrow{
      width:90px; height:90px;
      transform:rotate(0deg);
      transition:transform .08s linear;
      filter:drop-shadow(0 14px 30px rgba(0,0,0,.35));
    }
    #arrow path{fill:var(--lime)}

    #distancePill{
      background:var(--card);
      border:1px solid var(--border);
      border-radius:999px;
      padding:10px 14px;
      color:var(--text);
      font-weight:900;
      font-size:13px;
      backdrop-filter:blur(10px);
      box-shadow:var(--shadow);
      display:inline-flex;
      align-items:center;
      max-width:min(520px,94vw);
      white-space:nowrap;
    }
    #distanceText{
      overflow:hidden;
      text-overflow:ellipsis;
      max-width:100%;
    }

    #footer{
      align-self:center;
      width:min(520px,94vw);
      display:flex;
      gap:10px;
      pointer-events:auto;
    }
    #footer button{border-radius:16px; padding:10px 12px; font-weight:900}
  </style>
</head>

<body>
  <video id="cam" autoplay playsinline muted></video>

  <div id="splash">
    <img src="./assets/logo.svg" alt="Campus Wayfinder" />
    <div id="spinner"></div>
  </div>

  <div id="menu">
    <h1>Campus Wayfinder</h1>
    <p>Allow <b>Camera</b>, <b>Location</b> and <b>Motion</b> when asked.</p>
    <div class="btnRow">
      <button id="startBtn" class="btnPrimary">Start Navigation</button>
      <button id="resetBtn" class="btnGhost">Reset</button>
    </div>
  </div>

  <div id="hud">
    <div id="topCard">
      <p id="topTitle">Destination: Spoons</p>
      <p id="topSub">Estimated time: 5 minutes</p>
    </div>

    <div id="toast"></div>

    <div id="center">
      <div id="arrowWrap">
        <svg id="arrow" viewBox="0 0 100 100">
          <path d="M50 7 L76 55 H60 V92 H40 V55 H24 Z"></path>
        </svg>
        <div id="semi"></div>
      </div>

      <div id="distancePill">
        <span id="distanceText">Distance to destination: -- m</span>
      </div>
    </div>

    <div id="footer">
      <button id="stopBtn" class="btnGhost" style="flex:1">Stop</button>
    </div>
  </div>

<script>
  // route points (arrows aim to next waypoint)
  const ROUTE = [
    { name:"Start (Poster)",      lat:53.7698512154046,  lon:-0.36838928710517393 },
    { name:"Waypoint 2",          lat:53.7702119222983,  lon:-0.3683582932499405  },
    { name:"Waypoint 3",          lat:53.77063949566153, lon:-0.36830550551962915 },
    { name:"Waypoint 4",          lat:53.771121892644885,lon:-0.3682456100146112  },
    { name:"Waypoint 5",          lat:53.77167677372432, lon:-0.36812691354069216 },
    { name:"Waypoint 6",          lat:53.77162317714752, lon:-0.3671756992473263  },
    { name:"Destination (Spoons)",lat:53.77173654295845, lon:-0.36701474664587863 }
  ];
  const DEST = ROUTE[ROUTE.length - 1];

  // buildings (for "you are passing" message)
  const LANDMARKS = [
    { name:"Larkin Building",           lat:53.770298999999994, lon:-0.368293 },
    { name:"Chemistry Building",        lat:53.77096705860541,  lon:-0.3679494882103711 },
    { name:"Brynmor Jones Library",     lat:53.771161,          lon:-0.368523 },
    { name:"Robert Blackburn Building", lat:53.77138270374397,  lon:-0.36848045910014093 },
    { name:"Hardy Building",            lat:53.77142592119492,  lon:-0.3681547880130722 },
    { name:"Canham Turner Building",    lat:53.77172530620078,  lon:-0.36811243578327435 },
    { name:"Gulbenkian Centre",         lat:53.77169643461599,  lon:-0.367372587707564 },
    { name:"Student Hub (SU • SPAR • Wetherspoons)", lat:53.77169299417767, lon:-0.36694099722237183 }
  ];

  // values I tweaked while testing
  const ARRIVE_RADIUS = 18;      // metres
  const LANDMARK_RADIUS = 25;    // metres
  const LANDMARK_COOLDOWN = 45000;

  // elements
  const cam = document.getElementById('cam');
  const splash = document.getElementById('splash');
  const menu = document.getElementById('menu');
  const hud = document.getElementById('hud');
  const toast = document.getElementById('toast');
  const arrow = document.getElementById('arrow');
  const distanceText = document.getElementById('distanceText');

  const startBtn = document.getElementById('startBtn');
  const resetBtn = document.getElementById('resetBtn');
  const stopBtn = document.getElementById('stopBtn');

  // show menu after splash
  setTimeout(() => {
    splash.classList.add('hide');
    menu.classList.add('show');
  }, 5000);

  // state
  let watchId = null;
  let routeIndex = 0;
  let userPos = null;
  let heading = null; // 0..360
  let running = false;
  const lastToast = new Map();

  // helpers
  function toRad(d){ return d * Math.PI / 180; }
  function toDeg(r){ return r * 180 / Math.PI; }

  function dist(a,b){
    const R = 6371000;
    const dLat = toRad(b.lat - a.lat);
    const dLon = toRad(b.lon - a.lon);
    const lat1 = toRad(a.lat);
    const lat2 = toRad(b.lat);
    const x = Math.sin(dLat/2)**2 + Math.cos(lat1)*Math.cos(lat2)*Math.sin(dLon/2)**2;
    return 2 * R * Math.atan2(Math.sqrt(x), Math.sqrt(1-x));
  }

  function bearing(a,b){
    const lat1 = toRad(a.lat), lat2 = toRad(b.lat);
    const dLon = toRad(b.lon - a.lon);
    const y = Math.sin(dLon) * Math.cos(lat2);
    const x = Math.cos(lat1)*Math.sin(lat2) - Math.sin(lat1)*Math.cos(lat2)*Math.cos(dLon);
    return (toDeg(Math.atan2(y,x)) + 360) % 360;
  }

  function norm(d){
    d = d % 360;
    return d < 0 ? d + 360 : d;
  }

  function formatM(m){
    if (!isFinite(m)) return '--';
    if (m < 1000) return Math.round(m) + ' m';
    return (m/1000).toFixed(2) + ' km';
  }

  function showToast(msg){
    toast.textContent = msg;
    toast.classList.remove('toastIn','toastOut');
    void toast.offsetWidth;
    toast.classList.add('toastIn');
    setTimeout(() => {
      toast.classList.remove('toastIn');
      toast.classList.add('toastOut');
    }, 2200);
  }

  async function startCamera(){
    const stream = await navigator.mediaDevices.getUserMedia({
      video: { facingMode: { ideal:"environment" } },
      audio: false
    });
    cam.srcObject = stream;
  }

  async function askMotion(){
    // iOS safari needs this or heading might be null
    try{
      if (typeof DeviceOrientationEvent !== "undefined" &&
          typeof DeviceOrientationEvent.requestPermission === "function"){
        await DeviceOrientationEvent.requestPermission();
      }
    }catch(e){}
  }

  function startCompass(){
    window.addEventListener('deviceorientation', (e) => {
      let h = null;
      if (typeof e.webkitCompassHeading === 'number'){
        h = e.webkitCompassHeading;
      } else if (typeof e.alpha === 'number'){
        h = norm(360 - e.alpha);
      }
      if (h !== null && isFinite(h)){
        heading = h;
        if (running) tick();
      }
    }, { passive:true });
  }

  function startGPS(){
    watchId = navigator.geolocation.watchPosition(
      (p) => {
        userPos = { lat:p.coords.latitude, lon:p.coords.longitude };
        if (running) tick();
      },
      () => {},
      { enableHighAccuracy:true, maximumAge:1000, timeout:12000 }
    );
  }

  function checkLandmarks(){
    if (!userPos) return;
    for (const lm of LANDMARKS){
      const d = dist(userPos, lm);
      if (d <= LANDMARK_RADIUS){
        const last = lastToast.get(lm.name) || 0;
        if (Date.now() - last > LANDMARK_COOLDOWN){
          lastToast.set(lm.name, Date.now());
          showToast("You are passing: " + lm.name);
        }
      }
    }
  }

  function tick(){
    if (!userPos) return;

    // always show distance to final destination
    const dDest = dist(userPos, DEST);
    distanceText.textContent = "Distance to destination: " + formatM(dDest);

    // waypoint advance
    const wp = ROUTE[routeIndex];
    const dWp = dist(userPos, wp);
    if (dWp <= ARRIVE_RADIUS && routeIndex < ROUTE.length - 1){
      routeIndex++;
    }

    // arrow points to current waypoint
    const target = ROUTE[routeIndex];
    const b = bearing(userPos, target);
    const rel = (heading == null) ? b : norm(b - heading);

    arrow.style.transform = `rotate(${rel}deg)`;

    checkLandmarks();
  }

  async function startNav(){
    try{
      await startCamera();
    }catch(e){
      alert("Camera permission is required.");
      return;
    }

    await askMotion(); // if user blocks it, arrow still points but won't rotate properly

    if (!navigator.geolocation){
      alert("Geolocation not supported.");
      return;
    }

    startCompass();
    startGPS();

    running = true;
    hud.classList.add('on');
    menu.classList.remove('show');
    tick();
  }

  function resetNav(){
    routeIndex = 0;
    lastToast.clear();
    tick();
  }

  function stopNav(){
    running = false;
    hud.classList.remove('on');
    menu.classList.add('show');
    if (watchId !== null){
      navigator.geolocation.clearWatch(watchId);
      watchId = null;
    }
  }

  startBtn.addEventListener('click', startNav);
  resetBtn.addEventListener('click', resetNav);
  stopBtn.addEventListener('click', stopNav);
</script>
</body>
</html>
Emerging Technology Project Reflective Log
This portfolio shows the design and development of Campus Wayfinder, an emerging technology prototype designed to help new university students find their way around an unfamiliar campus. The idea was to create an experience where a student could scan a QR code on a poster and instantly access a browser based augmented reality (AR) navigation system. The experience uses the phone’s camera, GPS, and motion sensors to guide the user towards a destination using on screen arrows and contextual labels of nearby buildings.
The project unfortunately was not as straightforward as this. Throughout development, I encountered several technical and platform-related challenges that forced to me to rethink my approach. Rather than seeing this as a failure, the process became an important part of the project, as it required problem solving, research, and adapting my design to real world constraints. This log shows that journey, including difficulties I had and why I changed direction, but still managed to achieve the aims of the assignment.
Initial Platform choice and Complications
At the start of the project, I planned to build the Campus Wayfinder using 8th Wall, as it is a well-known WebAR platform that supports image targets, world tracking and Visual Positioning System (VPS). My original idea was to place 3D arrows directly onto the campus environment so that users could see them anchored to the ground as they walked.
However, once I started using 8th wall, I quickly ran into several limitations that made it difficult to continue. Access to VPS features is restricted and requires a paid subscription. Although that it’s possible to create locations on the map, the free version does not allow full testing or deployment of custom VPS locations. This meant that even though I could design the experience conceptually, I could not properly test and show it on campus in real world conditions.
8th wall relies heavily on App Keys, hosted builds and limited local testing. These restrictions made it hard to quickly test ideas, make changes while physically on campus and in result simulate the campus wayfinder. These issues were not caused by a lack of understanding or incorrect setup on my part, but by the limitations of the platform when used without a paid plan.
At this stage, I had to make an important decision. I could either reduce the scope of the project or rethink my approach entirely. So, I chose to take a step back and explore alternative ways of achieving the same goal.
Changing Direction and Rethinking the Approach
The goal of this assignment was not to use a specific AR platform, but to create a project that explores emerging technologies, demonstrates technical understanding, and shows thoughtful design. I realised that the core of my project was not tied to 8th wall itself, but to the idea of combining real-world movement with digital guidance. After research, I found that modern mobile browsers already provide access to many of the features needed for this type of experience, such as camera access, GPS tracking, and device orientation sensors.
This led me to change direction and build the project using HTML, CSS, and JavaScript instead. By using these, I was able to recreate much of the intended functionality without relying on a platform that had issues. The experience could still be launched by scanning a QR code, show a live camera feed, respond to the user’s location and movement, and guide them towards a destination. The transition was made easier by me having previous experience using HTML, CSS, and JavaScript in earlier projects. Having this background meant I was already comfortable building layouts, handling interactions and debugging issues. This allowed me to focus more on solving higher-level problems rather than learning everything from scratch. I also watched several video tutorials and blogs to help me better understand things like geolocation, device orientation, and mobile browser permissions.
Use of Emerging Technologies
The final version of Campus Wayfinder does not use native AR frameworks like ARkit or ARcore, instead it uses key principles of augmented reality. The experience overlays digital information onto the real world through a live camera feed and reacts to the user’s physical movement using GPS and compass data.
This type of WebAR-style experience is an emerging approach. This is because it prioritises accessibility and ease of use, as users do not need to download an app or have a specific device. Instead, everything runs directly in the browser, which aligns with current trends towards lightweight, accessible emerging technologies.
User Experience Design Decisions
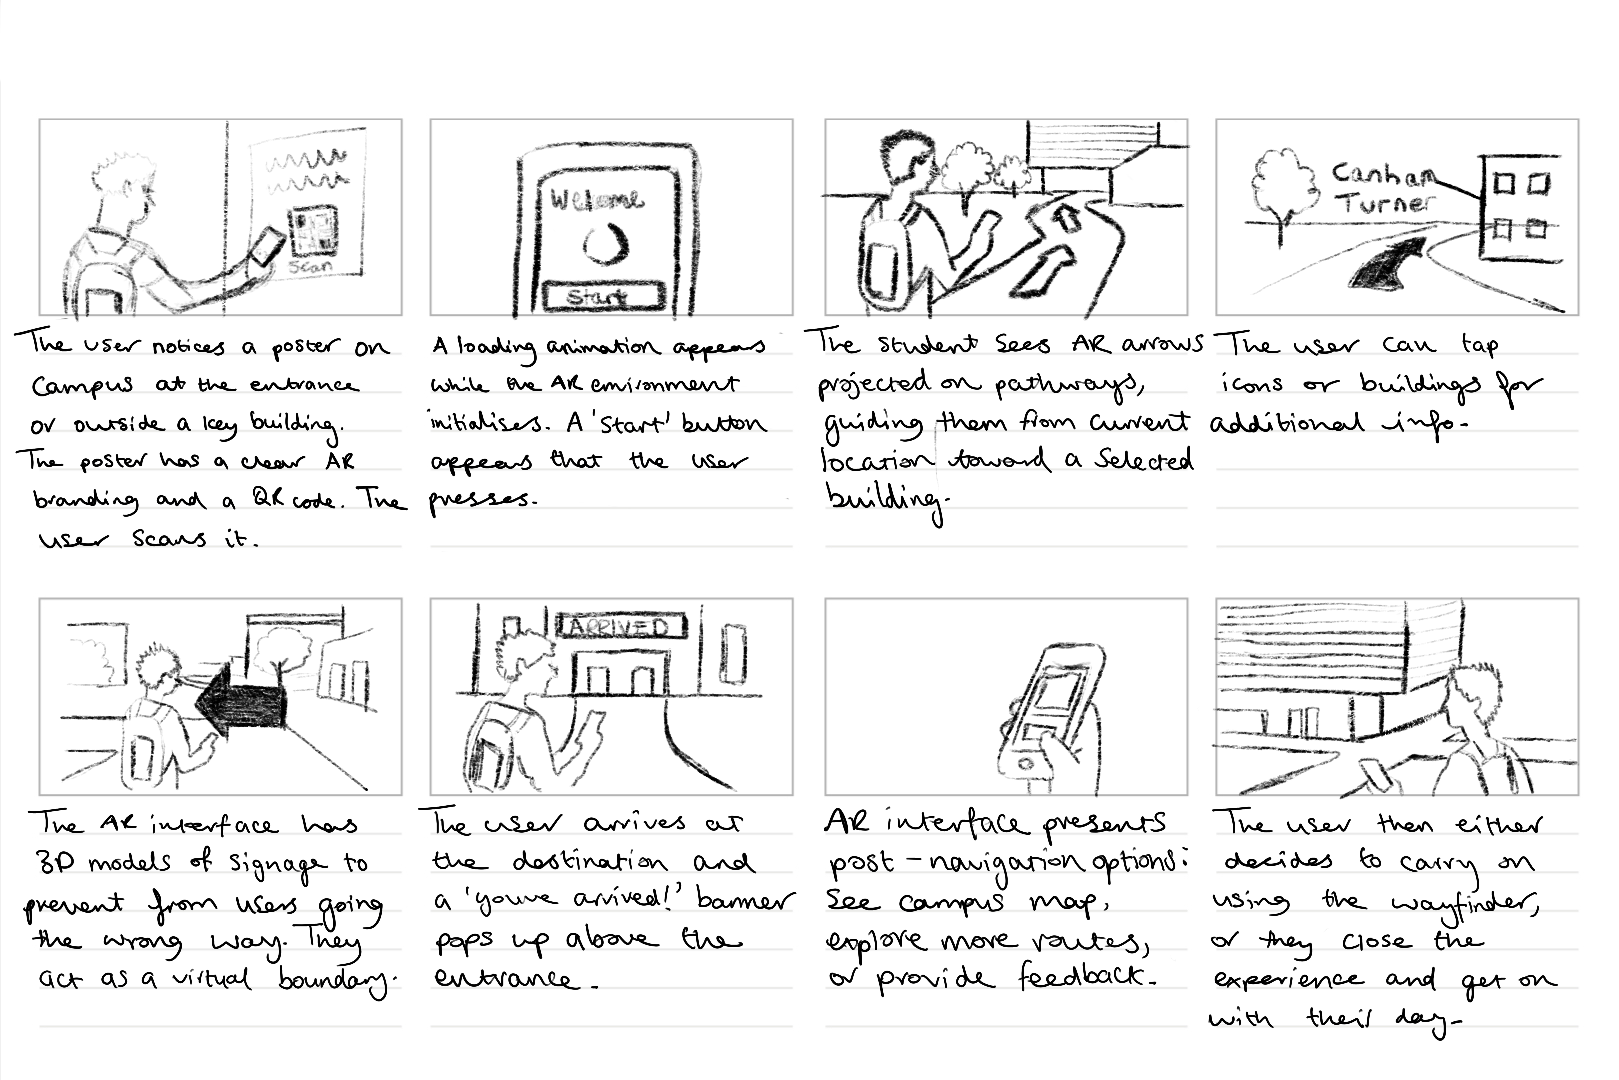
User experience was a major focus of the project. New students are often in a rush, unfamiliar with their surroundings, and may already feel overwhelmed. Because of this, I designed the experience to be as simple and clear as possible.
The experience starts with a short splash screen, followed by a simple menu that explains what permissions are needed and what will be used. Rather than presenting multiple options, the interface guides the user towards one clear action, to start navigation.
Originally, I wanted to place arrows directly onto the ground using world-locked AR. However, due to browser limitations on iOS, this approach was unreliable. Instead, I designed a HUD-style directional arrow that rotates based on the users compass heading. While this is technically simpler, it works consistently and is easy to understand, which ultimately makes for a better user experience.
To help users feel more confident about where they are, the system also displays temporary messages when they pass key landmarks, such as buildings on campus. This reinforces real world context and helps users gradually learn the layout if the campus.
Technical Challenges and How I Solved Them
One of the biggest technical challenges was dealing with GPS accuracy. GPS data can be unreliable, especially around buildings. To solve this, I avoided relying on exact coordinates and instead used distance ranges. When the user enters a certain radius around a checkpoint, the navigation updates smoothly rather than requiring perfect accuracy.
Another major challenge involved device orientation on iOS. Accessing compass data requires explicit permission, and the browser will not always prompt the user automatically. At first, this caused the directional arrow to stop responding. After researching the issue, I implemented direct permission requests for both motion and orientation sensors and added fallback logic to handle different browser behaviours. This process helped me gain a much better understanding of how mobile browsers manage sensor data.
Design Development and Decision-Making
A key focus throughout the development of Campus Wayfinder was ensuring that design decisions were driven by user needs and real-world context rather than purely aesthetic choices. From the early stages of the project, the aim was to create a navigation experience that felt intuitive, minimal, and suitable for use while moving through a physical environment.
One of the most important design decisions was the choice to prioritise visual guidance over text-based instructions. Traditional wayfinding systems, such as campus signage and public transport environments, highlight the effectiveness of simple directional symbols and high-contrast visuals. These systems rely on quick recognition rather than detailed information, which inspired the use of arrows, icons, and minimal copy throughout the interface. This approach helped reduce cognitive load and allowed users to focus on their surroundings rather than their screens.
Colour and contrast played a significant role in ensuring usability. The chosen colour palette was designed to remain visible in outdoor lighting conditions, while also aligning with an approachable familiar visual identity (University of Hull colours). High contrast between background elements and interactive components was used to improve legibility, particularly when the experience is used on the move. Rounded UI elements were intentionally chosen to create a friendly and accessible tone, reinforcing the idea that the system is designed to assist rather than overwhelm the user.
Typography was another key consideration. Mukta was chosen as it’s clear and legible type maintains readability at varying distances and screen sizes. Hierarchy was carefully applied so that essential information, such as direction and distance, always took priority over secondary content. This hierarchy ensured that users could quickly interpret the interface without needing to stop or concentrate on the screen for extended periods.
Iteration played a central role in shaping the final design. Early concepts explored more complex AR interactions, including placing 3D arrows directly into the environment. However, technical constraints and accessibility considerations resulted in a redesign of the interface. Instead of treating these limitations as setbacks, the design was adapted to focus on a HUD-style navigation system that still responded to the user’s movement and direction. This shift allowed the project to remain functional, accessible, and aligned with the original design goals.
Design tools such as Figma were used extensively to explore layout, spacing, and interaction flow before development began. This helped ensure consistency across screens and allowed design decisions to be tested visually before being implemented in code. Adobe Illustrator was used to develop the project’s branding and logo, reinforcing a cohesive visual identity across both physical posters and the digital interface.
Overall, the design process behind Campus Wayfinder demonstrates a balance between creativity and practicality. Each design decision was made with research and user context in mind, resulting in an experience that is both visually considered and functionally effective.
Software Proficiency
The main development was done using HTML, CSS, and JavaScript. My previous experience with these technologies allowed me to quickly prototype ideas and make changes as the project evolved. I combined this existing knowledge with online tutorials and blogs to overcome more complex challenges, particularly those related to mobile sensors and permissions.
CSS played a large role in the project, especially for animations and transitions. Sliding menus, fading headers, and animated arrows were all handled using CSS rather than heavy JavaScript, which helped keep performance smooth on mobile devices.
To host and test the Campus Wayfinder project, I used Netlify, a web-based hosting platform designed especially for web projects. Netlify allowed me to deploy the project quickly by simply dragging and dropping my HTML, CSS, JavaScript, and asset files into the platform, which automatically generated a live URL for testing and sharing. This deployment process was particularly helpful during development, as it allowed me to test the experience directly on my phone using real camera, GPS, and motion sensor data. The platform also removed the need for complex server configuration, allowing me to focus more on refining the interaction design and user experience rather than consuming time managing backend infrastructure.
For design, I used Figma to plan layouts, spacing, and interactions before implementing them in code. This helped me visualise the experience and maintain a consistent visual style.
I also used Adobe Illustrator to design the Campus Wayfinder logo. During development, I noticed that the logo text was not displaying correctly on the website. I fixed this by converting the text to outlines before exporting the SVG, ensuring it looked consistent across all devices.
Ethical Considerations
Because Campus Wayfinder uses camera access, location data, and motion sensors, ethical considerations were important. The experience only requests permissions when they are needed and explains clearly why they are required.
No user data is stored, tracked, or shared. The system does not run in the background and does not include analytics or third-party tracking. This follows principles of user consent, transparency, and data minimisation.
Accessibility was also considered. By using a browser-based approach and avoiding app installation, the experience is more accessible to a wider range of users and devices.
Forward Thinking and Future Development
Campus Wayfinder aligns with current and future trends in emerging technologies, particularly WebAR and location-based experiences. As browser support for advanced AR features improves, this type of project could evolve to include world-locked AR elements, indoor navigation, or more advanced spatial mapping.
Future improvements could include dynamic routes, accessibility-focused navigation modes, or integration with native AR frameworks where available. This project shows how emerging technologies can be explored realistically while still leaving room for future expansion.
Conclusion
Campus Wayfinder represents a practical exploration of emerging technologies through design, experimentation, and adaptation. Although my original plan was limited by platform constraints, changing direction allowed me to create a functional and well-considered prototype that still meets the aims of the assignment.
The project demonstrates technical problem-solving, user-centred design, ethical awareness, and forward-thinking development. Most importantly, it reflects the reality of working with emerging technologies: understanding limitations, adapting ideas, and finding effective solutions within those constraints.